Create a Template You Must Upload at Least 2 Images
Whether yous're starting from a born template or updating one of your own, Word'southward built-in tools assist you update templates to suit your needs. To update your template, open up the file, make the changes you want, and so save the template.
In Microsoft Word, you can create a template past saving a certificate as a .dotx file, .dot file, or a .dotm fie (a .dotm file type allows yous to enable macros in the file).
-
Click File > Open.
-
Double-click This PC. (In Discussion 2013, double-click Calculator).
-
Browse to the Custom Office Templates binder that's nether My Documents.
-
Click your template, and click Open.
-
Make the changes yous want, and then save and shut the template.
Add together content controls to a template
Make your templates flexible by adding and configuring content controls, such as rich text controls, pictures, driblet-downwardly lists, or engagement pickers.
For case, you lot might create a template that includes a drop-downwards list. If you allow editing to the drop-down list, other people can change the list options to run into their needs.
Note:If content controls are not bachelor, you may have opened a document or a template that was created in an earlier version of Word. To employ content controls, you lot must catechumen the document to the Word 2013 file format by clicking File > Info > Catechumen, and then clicking OK. After you convert the document or template, save it.
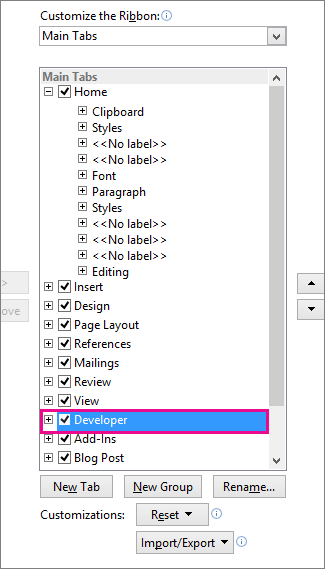
Before you can add content controls, you need to show the Developer tab.
-
Click File > Options > Customize Ribbon.
-
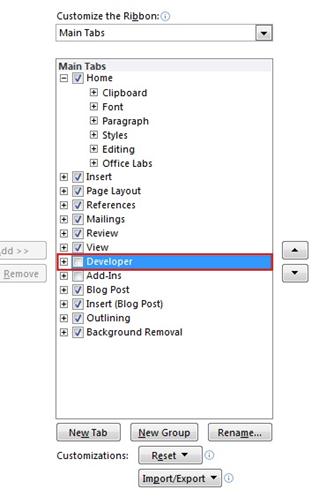
Nether Customize the Ribbon, select Primary Tabs.
-
In the list, select the Programmer check box, so click OK.
Add content controls
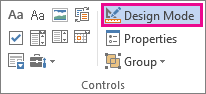
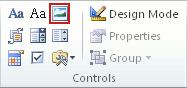
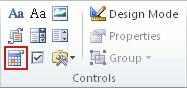
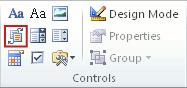
On the Developer tab, in the Controls group, click Blueprint Mode, and then insert the controls that you want.
Insert a text control where users tin can enter text
In a rich text content command, users can format text as assuming or italic, and they can type multiple paragraphs. If you want to limit what users add, insert the plain text content control.
-
In the document, click where y'all want to insert the control.
-
On the Programmer tab, in the Controls group, click Rich Text Content Control
 or the Obviously Text Content Command
  .
.
Insert a picture command
-
Click where you want to insert the control.
-
On the Developer tab, in the Controls group, click Picture Command
 .
.
Insert a philharmonic box or a drop-down list
In a combo box, users can select from a list of choices that you provide or they can type in their ain data. In a drop-downwardly list, users tin only select from the list of choices.
-
On the Developer tab, in the Controls group, click the Combo Box Content Control
 or Drop-Down List Content Control
  .
. -
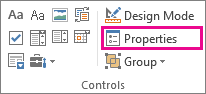
Select the content control, and so on the Programmer tab, in the Controls group, click Backdrop.
-
To create a list of choices, click Add under Philharmonic Box Properties or Drop-Down List Properties.
-
Blazon a choice in the Display Name box, such as Yes, No, or Mayhap. Echo this step until all of the choices are in the drop-down list.
-
Make full in any other backdrop that y'all want.
Note:If you lot select the Contents cannot be edited check box, users won't be able to click a choice..
Insert a date picker
-
Click where you want to insert the date picker control.
-
On the Developer tab, in the Controls group, click the Appointment Picker Content Command
 .
.
Insert a check box
-
Click where yous desire to insert the bank check box command.
-
On the Developer tab, in the Controls group, click the Bank check Box Content Control
 .
.
Insert a building block gallery control
You can use building cake controls when you want people to choose a specific block of text.
For example, building block controls are helpful if yous're setting up a contract template, and you need to add together unlike boilerplate text depending on the contract's specific requirements. You tin create rich text content controls for each version of the boilerplate text, and then you can utilise a building block gallery control as the container for the rich text content controls.
You can also use a building block control in a grade.
-
Click where you desire to insert the control.
-
On the Programmer tab, in the Controls group, click Building Block Gallery Content Control
 .
. -
Click the content command to select it.
-
On the Developer tab, in the Controls grouping, click Properties.
-
Click the Gallery and the Category for the building blocks that y'all desire to make available in the edifice block control.
Ready or modify the properties for content controls
-
Select the content control, and click Properties in the Controls group.
-
In the Content Command Properties dialog box, cull whether the content control tin can be deleted or edited when someone uses your template.
-
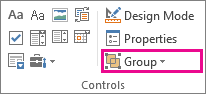
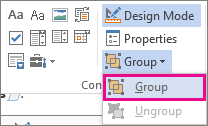
To keep several content controls or even a few paragraphs of text together, select the controls or the text, and and so click Group in the Controls grouping.
For example, perhaps you have a three-paragraph disclaimer. If y'all use the Group control to group the three paragraphs, the three-paragraph disclaimer cannot be edited and can be deleted but as a grouping.
Add together instructional text to a template
Instructional text can heighten the usability of the template that you create. You can change the default instructional text in content controls.
To customize the default instructional text for your template users, do the following:
-
On the Programmer tab, in the Controls grouping, click Blueprint Mode.
-
Click the content control where you want to revise the placeholder instructional text.
-
Edit the placeholder text and format it any way you want.
-
On the Developer tab, in the Controls group, click Design Mode to plough off the design feature and save the instructional text.
Add protection to a template
You tin can add protection to individual content controls in a template to assist preclude someone from deleting or editing a item content command or group of controls, or you can help protect all of the template content with a password.
Add together protection to parts of a template
-
Open up the template that you desire to add protection to.
-
Select the content controls to which yous want to restrict changes.
Tip:Select multiple controls past holding downwardly the CTRL key while you click the controls.
-
On the Programmer tab, in the Controls group, click Group, and then click Group again.
-
On the Developer tab, in the Controls grouping, click Properties.
-
In the Content Control Backdrop dialog box, nether Locking, do whatsoever of the post-obit:
-
Select the Content command cannot be deleted check box, which allows the content of the command to be edited but the command itself cannot exist deleted from the template or a document that is based on the template.
-
Select the Contents cannot exist edited check box, which allows you to delete the control merely does not let yous to edit the content in the command.
-
Utilize this setting when you want to protect text if it is included. For example, if you oftentimes include a disclaimer, you can help ensure that the text stays the same, and you can delete the disclaimer for documents that don't crave it.
Assign a countersign to a template
To assign a password to the document so that simply reviewers who know the password tin can remove the protection, practice the following:
-
Open the template that you desire to assign a password to.
-
On the Review tab, in the Protect grouping, click Restrict Editing.
-
Under Outset enforcement, click Yes, Starting time Enforcing Protection.
-
Type a countersign in the Enter new password (optional) box, and so ostend the password.
Of import:If you choose not to use a password, anyone tin modify your editing restrictions.
Apply strong passwords that combine uppercase and lowercase letters, numbers, and symbols. Weak passwords don't mix these elements. Strong password: Y6dh!et5. Weak password: House27. Passwords should exist at least 8 characters long. In general, longer a countersign is, the more secure information technology is.
It is critical that you lot remember your password. If y'all forget your password, Microsoft cannot retrieve it. Shop the passwords that you write down in a secure place away from the information that they help protect.
A template is a certificate type that creates a copy of itself when you open it.
For example, a business organization plan is a common certificate that is written in Word. Instead of creating the structure of the business plan from scratch, you can utilise a template with predefined page layout, fonts, margins, and styles. All you have to practice is open a template and fill in the text and the data that is specific to your document. When you salve the document every bit a .docx or .docm file, you save your document separately from the template on which it is based.
In a template, you tin provide recommended sections or required text for others to use, as well as content controls such as a predefined drop-down listing or a special logo. You can add protection to a section of a template, or y'all can utilise a password to the template to help protect the contents of the template from changes.
You tin find Discussion templates for nigh kinds of documents on Office.com. If you have an Internet connection, click the File tab, click New, and then click the template category that you want. Yous can also yous tin can create your own templates.
You can offset with a bare document and save it as a template, or you can create a template that is based on an existing document or template.
Start with a blank template
-
Click the File tab, then click New.
-
Click Blank document, and then click Create.
-
Brand the changes that you want to the margin settings, page size and orientation, styles, and other formats.
You can also add content controls such as a appointment picker, instructional text, and graphics that y'all want to appear in all new documents that you base on the template.
-
Click the File tab, and then click Salvage As.
-
Requite the new template a file proper noun, select Discussion Template in the Save as type list, and then click Relieve.
Notation:You lot tin can too save the template equally a Word Macro-Enabled Template (.dotm file) or a Word 97-2003 Template (.dot file).
-
Close the template.
-
Click the File tab, and and then click New.
-
Nether Available templates, click New from existing.
-
Click a template or a document that is similar to the one that you want to create, so click Create New.
-
Make the changes you want to the margin settings, folio size and orientation, styles, and other formats.
You can besides add together content controls such as a date picker, instructional text, and graphics you want to appear in all new documents that you base on the template.
-
Click the File tab, and then click Save As.
-
Give the new template a file name, select Give-and-take Template in the Save every bit type list, and and so click Save.
Annotation:You can also save the template as a Word Macro-Enabled Template (.dotm file) or a Word 97-2003 Template (.dot file).
-
Shut the template.
Building blocks are reusable pieces of content or other document parts that are stored in galleries to be accessed and reused at any time. You can too save building blocks and distribute them with templates.
For instance, y'all may create a study template that provides your template users with two cover letter types to choose from when they create their own report based on your template.
-
Relieve and close the template that you have designed just the way you want it and to which you desire to add edifice blocks for template users to choose from.
-
Open up the template.
Go along open the template to which you want to add building block options for template users.
-
Create the building blocks that you want to provide to your template users.
When you make full out the data in the Create New Building Block dialog box, in the Save in box make sure to click the template proper noun.
-
Distribute the template.
When you ship or make the template available to others, the building blocks you saved with the template volition be available in the galleries you specified.
You can offer flexibility to anyone who may use your template by adding and configuring content controls, such as rich text controls, pictures, drop-downwardly lists, or date pickers.
For example, you might provide a colleague with a template that includes a drop-down listing, but your colleague wants to utilize a dissimilar set of options in the drop-down list in the document that he'southward distributing based on your template. Considering you allowed editing to the drop-down list when you added the content control to the template, your colleague tin can speedily and hands change the template to meet his needs.
Note:If content controls are not available, you may accept opened a document or a template that was created in an earlier version of Word. To use content controls, you must catechumen the document to the Give-and-take 2010 file format past clicking the File tab, clicking Info, clicking Convert, and and so clicking OK. After you convert the document or template, save it.
To add together content controls, you need to testify the Developer tab.
Show the Developer tab
-
Click the File tab.
-
Click Options.
-
Click Customize Ribbon.
-
Under Customize the Ribbon , click Primary Tabs.
-
In the list, select the Programmer bank check box, and so click OK.
Add content controls
On the Developer tab, in the Controls group, click Design Mode, and and then insert the controls that yous desire.
Insert a text command where users tin can enter text
In a rich text content control, users tin format text as bold or italic, and they can type multiple paragraphs. If you want to limit what users add together, insert the plain text content control.
-
Click where you want to insert the control.
-
On the Developer tab, in the Controls group, click Rich Text Content Control
 or the Plainly Text Content Control
  .
.
Insert a flick control
-
Click where you want to insert the control.
-
On the Programmer tab, in the Controls group, click Picture Control.
Insert a philharmonic box or a driblet-down list
In a philharmonic box, users tin can select from a listing of choices that y'all provide or they can blazon in their own information. In a drop-down list, users can just select from the listing of choices.
-
On the Developer tab, in the Controls group, click the Combo Box Content Control
 or Drop-Downwardly Listing Content Control
  .
. -
Select the content control, and then on the Developer tab, in the Controls group, click Properties.
-
To create a list of choices, click Add together under Combo Box Backdrop or Drib-Down List Backdrop.
-
Blazon a choice in the Display Name box, such as Yep, No, or Maybe.
Echo this step until all of the choices are in the driblet-downwardly list.
-
Fill in whatever other backdrop that y'all desire.
Notation:If you select the Contents cannot be edited bank check box, users won't exist able to click a choice.
Insert a date picker
-
Click where you want to insert the appointment picker control.
-
On the Developer tab, in the Controls group, click the Engagement Picker Content Control.
Insert a check box
-
Click where y'all want to insert the bank check box command.
-
On the Developer tab, in the Controls group, click the Check Box Content Control.

Insert a edifice block gallery control
You can use edifice cake controls when you want people to choose a specific cake of text.
For example, building block controls are helpful if y'all're setting up a contract template, and you need to add different boilerplate text depending on the contract's specific requirements. You can create rich text content controls for each version of the boilerplate text, and so yous tin can utilize a edifice block gallery control as the container for the rich text content controls.
You can also utilize a building cake command in a form.
-
Click where you desire to insert the control.
-
On the Developer tab, in the Controls group, click Building Block Gallery Content Command.
-
Click the content command to select it.
-
On the Programmer tab, in the Controls group, click Properties.
-
Click the Gallery and the Category for the edifice blocks that you lot desire to make available in the building cake command.
Set or modify the properties for content controls
-
Select the content control, and click Properties in the Controls group.
-
In the Content Control Properties dialog box, choose whether the content control tin be deleted or edited when someone uses your template.
-
To proceed several content controls or fifty-fifty a few paragraphs of text together, select the controls or the text, and so click Group in Controls group.
For example, peradventure yous have a three-paragraph disclaimer. If y'all employ the Group control to group the three paragraphs, the iii-paragraph disclaimer cannot be edited and can be deleted only as a grouping.
Add instructional text to a template
Instructional text can enhance the usability of the template that yous create. You tin can modify the default instructional text in content controls.
To customize the default instructional text for your template users, do the post-obit:
-
On the Developer tab, in the Controls group, click Design Mode.
-
Click the content control where you lot desire to revise the placeholder instructional text.
-
Edit the placeholder text and format it any way you want.
-
On the Developer tab, in the Controls group, click Pattern Mode to plow off the design feature and save the instructional text.
Y'all tin can add protection to individual content controls in a template to assistance prevent someone from deleting or editing a particular content control or grouping of controls, or you can aid protect all of the template content with a password.
Add together protection to parts of a template
-
Open the template that you want to add protection to.
-
Select the content controls to which you desire to restrict changes.
To select multiple controls hold down the CTRL key while y'all click the controls.
-
On the Developer tab, in the Controls group, click Group, and so click Group again.
-
On the Programmer tab, in the Controls grouping, click Properties.
-
In the Content Control Properties dialog box, under Locking, do any of the following:
-
Select the Content control cannot exist deleted check box, which allows the content of the command to be edited just the command itself cannot be deleted from the template or a document that is based on the template.
-
Select the Contents cannot be edited check box, which allows y'all to delete the command only does non let you to edit the content in the control.
Use this setting when you desire to protect text if information technology is included. For example, if you frequently include a disclaimer, you lot tin can help ensure that the text stays the same, and you tin delete the disclaimer for documents that don't crave it.
-
Assign a countersign to a template
To assign a password to the certificate and then that only reviewers who know the password tin remove the protection, exercise the post-obit:
-
Open the template that you lot want to assign a countersign to.
-
On the Review tab, in the Protect group, click Restrict Editing.
-
Under Outset enforcement, click Yes, Start Enforcing Protection.
-
Type a countersign in the Enter new password (optional) box, and then ostend the password.
Of import:If you lot choose not to utilize a password, anyone tin can change your editing restrictions.
Passwords should exist 8 or more characters in length.
It is critical that you recall your password. If you lot forget your countersign, Microsoft cannot recall it. Store the passwords that you write downwards in a secure place away from the information that they help protect.
A template is a document type that creates a copy of itself when you open it.
For example, a business plan is a common certificate that is written in Discussion. Instead of creating the structure of the business programme from scratch, you can use a template with predefined page layout, fonts, margins, and styles. All you accept to do is open a template and fill in the text and the data that is specific to your document. When yous salvage the document every bit a .docx or .docm file, you lot save your certificate separately from the template on which information technology is based.
In a template, you can provide recommended sections or required text for others to use, likewise as content controls such as a predefined drib-down listing or a special logo. You can add together protection to a section of a template, or you lot can utilize a password to the template to help protect the contents of the template from changes.
You tin observe Word templates for most kinds of documents on Office.com. If you have an Net connection, click the File tab, click New, and then click the template category that you desire. Yous tin also you can create your own templates.
Important: Office 2007 is no longer supported. Upgrade to Microsoft 365 to piece of work anywhere from whatsoever device and go along to receive support.
Upgrade now
You can offset with a blank document and save information technology as a template, or y'all tin can create a template that is based on an existing document or template.
Start with a blank template
-
Click the Microsoft Office Push
 , and then click New.
 -
Click Blank document, and so click Create.
-
Make the changes that you desire to the margin settings, page size and orientation, styles, and other formats.
You lot can also add together instructional text, content controls such as a appointment picker, and graphics that you want to announced in all new documents that you base on the template.
-
Click the Microsoft Office Push button
, and then click Save As. -
Requite the new template a file name, select Discussion Template in the Save every bit type list, and then click Save.
Note:Y'all can likewise save the template as a Give-and-take Macro-Enabled Template (.dotm file) or a Word 97-2003 Template (.dot file).
-
Close the template.
-
Click the Microsoft Office Button
, and and then click Open. -
Open the document that you want.
-
Brand the changes that you want to appear in all new documents that yous base on the template.
-
Click the Microsoft Office Button
, and then click Relieve As. -
Give the new template a file proper noun, select Word Template in the Save as type list, and and so click Save.
Note:Y'all tin too salve the template as a Word Macro-Enabled Template (.dotm file) or a Word 97-2003 Template (.dot file).
-
Shut the template.
-
Click the Microsoft Role Button
, so click New. -
Under Templates, click New from existing.
-
Click a template that is similar to the i that you want to create, and and so click Create New.
-
Make the changes y'all want to the margin settings, page size and orientation, styles, and other formats.
Yous can also add together instructional text, content controls such every bit a appointment picker, and graphics you want to announced in all new documents that you base on the template.
-
Click the Microsoft Office Button
, and and then click Save Every bit. -
Give the new template a file name, click Word Template in the Save as type box, and then click Salve.
Note:Y'all can also save the template equally a Give-and-take Macro-Enabled Template (.dotm file) or a Word 97-2003 Template (.dot file).
-
Close the template.
You can offer flexibility to anyone who may apply your template by adding and configuring content controls, such as rich text controls, pictures, drop-downwardly lists, or date pickers.
For example, you might provide a colleague with a template that includes a drop-down listing, but your colleague wants to use a dissimilar set of options in the drop-down list in the document that he'due south distributing based on your template. Because you allowed editing to the drop-down list when yous added the content command to the template, your colleague can apace and hands alter the template to meet his needs.
Add content controls
Note:You can also add together content controls to documents.
-
Click the Microsoft Office Button
, and so click Word Options. -
Click Popular.
-
Select the Show Programmer tab in the Ribbon check box, and and then click OK.
Annotation:The Ribbon is a component of the Microsoft Part Fluent user interface.
-
Open up the template to which you desire to add content controls, and then click where you desire to insert a control.
-
On the Programmer tab, in the Controls grouping, click the content control that y'all want to add to your certificate or template.
For example, you lot tin can click Rich Text to insert a rich text command that will appear in any document that is created by using the template.
Note:If content controls are not available, you may have opened a certificate that was created in an earlier version of Word. To apply content controls, you must convert the document to the Word 2007 file format by clicking the Microsoft Role Push
, clicking Catechumen, and and then clicking OK. Afterwards you convert the document, salve it. -
Select the content control, and click Properties in the Controls group.
-
In the Content Control Properties dialog box, choose whether the content control tin can exist deleted or edited when someone uses your template.
-
To keep several content controls or even a few paragraphs of text together, select the controls or the text, and then click Group in Controls group.
For example, perhaps you have a three-paragraph disclaimer. If you use the Grouping command to group the three paragraphs, the three-paragraph disclaimer cannot be edited and can be deleted only every bit a grouping.
Add instructional text to a template
Sometimes it is useful to include placeholder instructions for how to fill out a item content control that you accept added to a template. The instructions are replaced by content when someone uses the template.
-
On the Programmer tab, in the Controls group, click Design Way.
-
If y'all haven't already added a content control to your document, click where you want the control to appear, and so click a command.
Annotation:If content controls are not available, y'all may have opened a document created in an earlier version of Give-and-take. To use content controls, you must convert the document to the Word 2007 file format by clicking the Microsoft Office Push
, clicking Convert, and then clicking OK. Later on yous convert the document, save it. -
On the Developer tab, in the Controls group, click Design Mode.
-
Click the content control to which you want to add placeholder text.
-
Edit the placeholder text and format it whatever mode y'all want.
If you add together a text box content control and you want the placeholder text to disappear when someone types in their own text, in the Controls group, click Properties, and and then select the Remove content control when contents are edited check box.
Save and distribute building blocks with a template
Building blocks are reusable pieces of content or other certificate parts that are stored in galleries to be accessed and reused at any fourth dimension. Y'all can also save building blocks and distribute them with templates. For example, you lot may create a study template that provides your template users with ii embrace letter types to choose from when they create their own study based on your template.
-
Relieve and close the template that you have designed but the way you desire information technology and to which yous want to add building blocks for template users to cull from.
-
Open the template.
Keep open up the template to which you want to add edifice block options for template users.
-
Create the building blocks that you desire to provide to your template users.
When you fill out the information in the Create New Edifice Cake dialog box, in the Salvage in box make sure to click the template name.
-
Distribute the template.
When yous transport or make the template available to others, the edifice blocks you saved with the template will exist available in the galleries you specified.
Yous can add protection to individual content controls in a template to help foreclose someone from deleting or editing a item content command or group of controls, or y'all tin help protect all of the template content with a password.
Add together protection to parts of a template
-
Open the template that you want to add protection to.
-
Select the content controls or the group of controls to which you want to restrict changes.
-
On the Developer tab, in the Controls grouping, click Properties.
-
In the Content Control Backdrop dialog box, under Locking, do any of the following:
-
Select the Content control cannot be deleted cheque box, which allows the content of the control to exist edited but the control itself cannot be deleted from the template or a document that is based on the template.
-
Select the Contents cannot be edited cheque box, which allows you to delete the control but does not permit you to edit the content in the control.
Apply this setting when you want to protect text if it is included. For example, if you ofttimes include a disclaimer, yous can assistance ensure that the text stays the same, and you can delete the disclaimer for documents that don't require it.
-
Add protection to all of the contents of a template
-
Open up the template that y'all desire to help protect from changes.
-
On the Programmer tab, in the Protect group, click Protect Document, and and then click Restrict Formatting and Editing.
-
In the Protect Certificate job pane, under Editing restrictions, select the Allow only this type of editing in the document cheque box.
-
In the listing of editing restrictions, click the restrictions that you want.
-
To cull boosted brake options, such every bit who can read or modify the document, click Restrict permission.
Restriction options include setting an expiration date for the certificate and assuasive users to copy content.
-
Under Offset enforcement, click Yes, Start Enforcing Protection.
-
To assign a password to the document so that only reviewers who know the password tin remove the protection, type a password in the Enter new countersign (optional) box, and and then confirm the countersign.
Of import:If you cull not to utilise a password, anyone can change your editing restrictions.
For example, a concern plan is a common document written in Discussion. Instead of creating the structure of the business program from scratch, you can use a template with predefined page layout, fonts, margins, and styles. All you have to exercise is open a template and fill in the text and the data that is specific to your certificate. When you lot save the document as a .docx or .docm file, you lot save your document separately from the template on which it is based.
Templates are exactly similar documents in that you can provide recommended sections or required text for others to employ, as well as content controls such as a predefined drop-down list or a special logo. Y'all can add protection to a section of a template, or you can utilize a password to the template to aid protect the contents of the template from changes.
You can find Give-and-take templates for nigh kinds of documents on Microsoft Role Online. If you take an Internet connection, click the Microsoft Office Button , click New, and then click the template category that yous want. Alternatively, you lot can create your own templates.
yarbroughancon1962.blogspot.com
Source: https://support.microsoft.com/en-us/office/save-a-word-document-as-a-template-cb17846d-ecec-49d4-82ea-a6f5e3e8b9ae
Postar um comentário for "Create a Template You Must Upload at Least 2 Images"